Armada has a great objective system. They add depth to what would otherwise just be brutal slugfest, and allow us to not only build a fleet that is designed to earn points from the objective but to immerse us in the narrative of the mission. One of the most iconic moments in so many Sci-Fi features is that of a
group of ships attempting to destroy or capture a space station. We see
the fleet jump in nearby and duking it out with the defense forces
until whichever side can take no more, flees. Armada has brought us a
mission set that seeks to capture this feeling with two objectives from
the Corellian Conflict campaign, that also are well suited for building a fleet to take advantage of. The Station Assault objective was added
as a standard red objective, while Show of Force is the Imperial
Special Assault for during campaign play. Let's delve a bit deeper into
the objectives and see what they're giving us to work with:


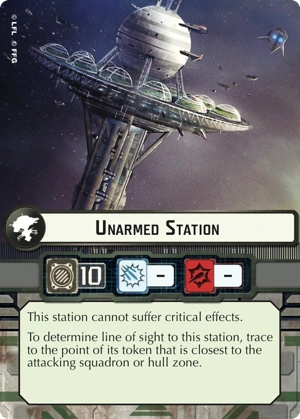
The unarmed station is an interesting, if somewhat squishy, target. It has 10 hull, but no shields or defense tokens to bolster its survivability. The Station Tokens are fairly large, so there is a lot of chance to be able to get line of sight, especially with fighters. 10 Hull can hold up for a bit against ship based attacks, especially a typical single activation, but a competent bomber wing (Yavris Bs for example) can pretty easily pile on 7 damage in a single command.

The second overall strategy is what I will call the Honey Pot. The stations are very juicy target, and setting one or both away from your fleet can divert enemy forces to try to destroy them. This in turn can allow your own fleet a chance to gain local superiority over forces that try to stave off a flanking maneuver. This strategy is the much riskier one though, since it places the stations at risk by necessity. It also likely brings the greatest reward, since most of your ships should not be bearing the brunt of enemy fire, and could potentially engage and destroy a large portion of the enemy fleet if it is misplaced or overwhelmed.
Both overall strategies can benefit by using elements of the other. The Honey Pot can have elements of the first, using a ship such a VSD that can take a bit of damage to defend the Honey Pot and buy time for your flanking forces to get in. On the other side, ships like Demolisher and Admonition can be placed away from the station and used to jump into an enemy flank to slow progress towards a station. These objectives offer a lot of choices for both players, and as second player you can determine a lot of the pacing and action.
2 Big Ships: Something like a dual ISD list with a few gozantis could utilize this objective to really draw enemy forces directly into those power front arcs. Being big and tanky also helps that even if you lose the stations, you will not lose ships and can even out the point differential. ISDs and MC80 Liberties are also tough enough to take some damage if employing a Honey Pot scheme, allow their counterpart to get into position to hit an isolated flank, or come in from behind.
Rieekan Aces: General Rieekan is surprisingly well suited for this style of base defense for a few reasons: utilizing ships like a CR90 to help block enemy movement and obstruct shots are very good for being able to help deflect attacks from the station, and fleets of this type also typically carry a Yavaris Bomber Wing, which can be deployed to help force an opposing fleet into taking a longer route to the stations (limiting firing time) or to help double tap enemy squadrons trying to get into bombing range. Ace fighters will also find their utility growing by continuing to lock down bombers, and frustrating groups without a strong Intel presence.
Carrier Wings: Much like Rieekan Aces, carrier wings on the Imperial Side like this objective. Using Major Rhymer as a land mine is an effective way to slow an approach, and Vic 1s are well suited to sitting in place and absorbing damage while tossing out red dice at Rhymer softened ships. This can also be very good with a Honey Pot, as the bomber wing can help hold the station while a Demolisher or ISD flanks in from the other side to overwhelm defense.
MSU: Likely not a great choice for using either objective. MSU fleets tend to not be overly tanky, and work best when being able to out-activate and outmaneuver around opposing ships. It can work with the Honey Pot strategy though, as a means of channeling enemy forces to a position where you can possibly get around both flanks. A 3x MC30 list could potentially ruin an approaching fleet if the opposing player does not take care. However, this is a very risky proposition, especially against heavy bomber wings that can simply sit near the stations and earn 80 points fairly quickly.
Broadside fleets: Rebel broadsides will typically struggle to earn a lot of points in these objectives. Defending the station is difficult when you need to really keep a ship between the station and incoming ships. Broadsides can do it, but it far more difficult to do so and keep your guns pointed down range. Like MSU, broadsiders can get some mileage from the Honey Pot, but again put themselves at risk for losing the stations to a faster fleet.
A few different ships and commanders can get quite a lot of utility from these objectives. For the Rebels, the afore-mentioned General Rieekan and also Commander Sato both stand to do well with them. Commander Sato likes big guns that he can keep on target, and knowing a general area of where to place fighter screens to keep swapping dice. General Tagge on the Imperial side sees a small boost to his usefulness, since ships under his command want the enemy to engage early and he allows you to be a little more aggressive with token usage to keep soaking hits.
For the Rebels, Nebulon Bs that are not Yavaris also gain a nice advantage in being able to consistently point their guns down a predictable path and not face a lot of chance for flanking. Salvation is a good buy, but even a stock Neb can see some good results. On the Imperial Side, an often overlooked ship like the Interdictor can see a lot of utility in these missions. By equipping Grav Shift Re-route an Interdictor can move the stations and shift obstacles more into the path. It also can utilize the Grav Well Projector to force enemy deployment to be either further from the station, or spend several turns trying to navigate their way out. This should also serve as a warning in case you are facing an Interdictor based fleet. It should be obvious here that facing an Interdictor can be very difficult in these scenarios as well for the reasons why it helps you. Have a plan to be able to charge ahead or Repair away an early damage card if they toss obstacles in your path.
These Station Assault objectives are some of my favorite in Armada. They allow you to really tailor a fleet to play with them to take maximum effect. It reinforces thematic play, since its something we've seen in countless science fiction novels and shows, and the objective can truly capture the feel of defending a space station that you have to hold. The objectives open up the usage of several ships that don't typically see the table but are able to shine here.
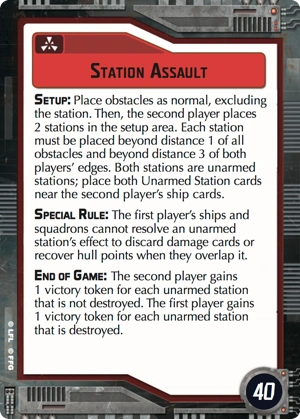
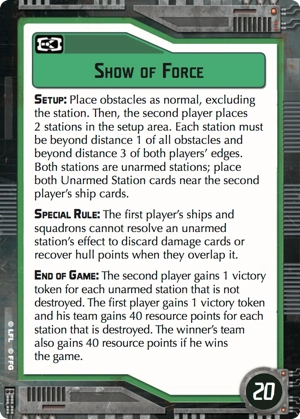
- Both objectives add an additional obstacle in the form of a second Station.
- The first player does not get to resolve standard station effects from either station. Second player still does however get to use this benefit.
- The Stations are unarmed stations for purposes of damage, something we will look further at in a moment.
- Unlike Contested Outpost, the stations still do count for obstruction.
- As second player, you now get to place 4 of the 6 objectives so you really can control the board position.
The unarmed station is an interesting, if somewhat squishy, target. It has 10 hull, but no shields or defense tokens to bolster its survivability. The Station Tokens are fairly large, so there is a lot of chance to be able to get line of sight, especially with fighters. 10 Hull can hold up for a bit against ship based attacks, especially a typical single activation, but a competent bomber wing (Yavris Bs for example) can pretty easily pile on 7 damage in a single command.
General Strategy
With a pair of enticingly soft-ish targets, two main grand planning strategies spring to mind for how to use them. The first is the obvious, classical station defense. Placing the stations near your deployment zone and subsequently deploying near the station will force your opponent to come to you. In most cases you will be able to have forced your opponent to approach from a predictable route. This can allow ships that are vulnerable to flanking such as a VSD, MC80 Liberty or Nebulon B to utilize their large forward-facing dice pool. This strategy can also help defend against the large threat of bombers to the stations, since you can see approaches and clog them with your own fighters. This strategy can face issues against faster moving swarms that can navigate a well placed obstacle field. A fleet that can pressure on multiple fronts will make it tough to defend the stations as well as do enough damage to ships to garner points from their destruction.The second overall strategy is what I will call the Honey Pot. The stations are very juicy target, and setting one or both away from your fleet can divert enemy forces to try to destroy them. This in turn can allow your own fleet a chance to gain local superiority over forces that try to stave off a flanking maneuver. This strategy is the much riskier one though, since it places the stations at risk by necessity. It also likely brings the greatest reward, since most of your ships should not be bearing the brunt of enemy fire, and could potentially engage and destroy a large portion of the enemy fleet if it is misplaced or overwhelmed.
Both overall strategies can benefit by using elements of the other. The Honey Pot can have elements of the first, using a ship such a VSD that can take a bit of damage to defend the Honey Pot and buy time for your flanking forces to get in. On the other side, ships like Demolisher and Admonition can be placed away from the station and used to jump into an enemy flank to slow progress towards a station. These objectives offer a lot of choices for both players, and as second player you can determine a lot of the pacing and action.
Fleet Building
Armada has several fleet archetypes that can utilize these objectives, some more effectively than others.Fleets that like these objectives:
2 Big Ships: Something like a dual ISD list with a few gozantis could utilize this objective to really draw enemy forces directly into those power front arcs. Being big and tanky also helps that even if you lose the stations, you will not lose ships and can even out the point differential. ISDs and MC80 Liberties are also tough enough to take some damage if employing a Honey Pot scheme, allow their counterpart to get into position to hit an isolated flank, or come in from behind.
Rieekan Aces: General Rieekan is surprisingly well suited for this style of base defense for a few reasons: utilizing ships like a CR90 to help block enemy movement and obstruct shots are very good for being able to help deflect attacks from the station, and fleets of this type also typically carry a Yavaris Bomber Wing, which can be deployed to help force an opposing fleet into taking a longer route to the stations (limiting firing time) or to help double tap enemy squadrons trying to get into bombing range. Ace fighters will also find their utility growing by continuing to lock down bombers, and frustrating groups without a strong Intel presence.
Carrier Wings: Much like Rieekan Aces, carrier wings on the Imperial Side like this objective. Using Major Rhymer as a land mine is an effective way to slow an approach, and Vic 1s are well suited to sitting in place and absorbing damage while tossing out red dice at Rhymer softened ships. This can also be very good with a Honey Pot, as the bomber wing can help hold the station while a Demolisher or ISD flanks in from the other side to overwhelm defense.
Fleets that can utilize the objectives but have better options:
MSU: Likely not a great choice for using either objective. MSU fleets tend to not be overly tanky, and work best when being able to out-activate and outmaneuver around opposing ships. It can work with the Honey Pot strategy though, as a means of channeling enemy forces to a position where you can possibly get around both flanks. A 3x MC30 list could potentially ruin an approaching fleet if the opposing player does not take care. However, this is a very risky proposition, especially against heavy bomber wings that can simply sit near the stations and earn 80 points fairly quickly.
Broadside fleets: Rebel broadsides will typically struggle to earn a lot of points in these objectives. Defending the station is difficult when you need to really keep a ship between the station and incoming ships. Broadsides can do it, but it far more difficult to do so and keep your guns pointed down range. Like MSU, broadsiders can get some mileage from the Honey Pot, but again put themselves at risk for losing the stations to a faster fleet.
A few other options
A few different ships and commanders can get quite a lot of utility from these objectives. For the Rebels, the afore-mentioned General Rieekan and also Commander Sato both stand to do well with them. Commander Sato likes big guns that he can keep on target, and knowing a general area of where to place fighter screens to keep swapping dice. General Tagge on the Imperial side sees a small boost to his usefulness, since ships under his command want the enemy to engage early and he allows you to be a little more aggressive with token usage to keep soaking hits.
For the Rebels, Nebulon Bs that are not Yavaris also gain a nice advantage in being able to consistently point their guns down a predictable path and not face a lot of chance for flanking. Salvation is a good buy, but even a stock Neb can see some good results. On the Imperial Side, an often overlooked ship like the Interdictor can see a lot of utility in these missions. By equipping Grav Shift Re-route an Interdictor can move the stations and shift obstacles more into the path. It also can utilize the Grav Well Projector to force enemy deployment to be either further from the station, or spend several turns trying to navigate their way out. This should also serve as a warning in case you are facing an Interdictor based fleet. It should be obvious here that facing an Interdictor can be very difficult in these scenarios as well for the reasons why it helps you. Have a plan to be able to charge ahead or Repair away an early damage card if they toss obstacles in your path.
Final Thoughts
These Station Assault objectives are some of my favorite in Armada. They allow you to really tailor a fleet to play with them to take maximum effect. It reinforces thematic play, since its something we've seen in countless science fiction novels and shows, and the objective can truly capture the feel of defending a space station that you have to hold. The objectives open up the usage of several ships that don't typically see the table but are able to shine here.
No comments:
Post a Comment