Showing posts with label Star Wars. Show all posts

Monday, June 24, 2019

Outer Rim Game Review

Our gaming group was lucky to find a copy of Fantasy Flight's newest Star Wars game Outer Rim at our FLGS last week.  The much hyped game has you play as one of the better known Bounty Hunters or smugglers in Star Wars lore as they gain fame and fortune by completing jobs and moving cargo.
 
Characters start the game with one of two basic ships, and either a job to complete or some cargo to deliver.  Each player turn has three sections to it.  In the first section, they can move to a new location, heal,  or gain some credits at their current location.  Then players can turn in any bounties or cargo, buy items from the shop area or trade items with other players at their location.  The shop area contains gear that enhance players, crew that help out, and jobs and cargo for players to complete and sell.  Then players can do an encounter at their location, either meeting with contacts, doing a job encounter, or a location encounter.


The full board

The encounters are somewhat similar to the way FFG did their Fallout game, with cards giving tests to pass based on character attributes.  Tests use two dice, with a critical needing to be rolled to pass. If your character has a tested attribute (Strength, Tactics, Knowledge etc etc) its easier to pass with either a hit or a critical.  Combat works in a similar fashion, with each player rolling dice equal to their combat strength against their opponents dice.  There were only 6 dice included, but we pretty quickly had attributes up to 7 or 8 in value, so FFG probably should ship a few more with the game.

Your player tableau, Bossk in a HWK-290
The game overall is enjoyable.  You jet around and pull heists, find bounties to capture and upgrade your gear.  It takes a little time to get your machine rolling (especially with bounties, since you need to investigate characters first).  Player interaction is a little low, but you can make trades and ask for promises and credits from anywhere on the board.  I was able to extract a favor from another player in return for not stopping them from buying a ship on my turn, which was a fun way of politicing.  Attacking other players is possible, but its limited so its an area that's not really explored in the game.  If you've enjoyed most of FFG's other offerings, this game fits in nicely for a fun time with plenty of memories.

The only aspect that felt not very pivotal was the different faction patrols.  There are encounters with them, and having your reputation up with factions makes it easier to move around.  But overall since the patrols don't do a lot of movement and at neutral reputation just stop your movement they play a very minor role.  If there was more to their movement or more patrols going I think it would make that aspect a bit better.


Wednesday, April 24, 2019

Legion Battle Report: Krennic vs Leia and Jyn

This past weekend finally got a chance to break out our Legion stuff again. We decided to play with all the new stuff we have gotten since our last matchup (maybe in January?) which meant running Jyn and pathfinders for my Rebel opponent, while I took Krennic and a set of Death Troopers into the field.  Mine was a super mish-mashed list with just about all the one off units I own.

Director Orson Krennic 90
Improvised Orders, Esteemed Leader
Snowtroopers 48
Flametrooper, Snowtrooper, Fragmentation Grenades,
Stormtroopers 44
DLT-19 Stormtrooper, Stormtrooper, Fragmentation Grenades,
Stormtroopers 44
DLT-19 Stormtrooper, Stormtrooper,
Stormtroopers 44
DLT-19 Stormtrooper, Stormtrooper,
Stormtroopers 44
DLT-19 Stormtrooper, Stormtrooper,
Imperial Royal Guards 75
Electrostaff Guard, Tenacity,
Scout Troopers (Strike Team) 16
DLT-19x Sniper, Hunter, Grappling Hooks,
Imperial Death Troopers 76
DLT-19D Trooper, Overwatch, E-11D Focused Fire Config, Fragmentation Grenades, 

It certainly is not the best list but it provides plenty of activations, some area control and some very hard hitting ranged units.  My opponents list was Jyn and Leia, with three groups of Z6 rebel troopers, a sniper team, the FD turret and two units of pathfinders.


Sadly, my camera decided to eat my photos of the game, but I'll give the text recap here.

Our scenario ended up as Repair the Vaporators, Long March and Clear Conditions. Long March ended up being a real pain point for me because of how the board was set.  When we had set the board up we really set it for the long sides being deployment areas.  This meant a nice big building of blocking terrain In the middle and plenty of it to provide cover to advance In the short direction.  In essence my side for Long March ended up having much less cover going forward. 

Deployment saw me drop just about everyone on a small hill behind the building to give as much line of sight blocking as possible and give the light cover the hill would provide.  My snipers were deployed semi on a hill further from me to give some extra line of sight but also hide them from his Snipers. I place one Vaporator in the middle of the board, behind the building and the other range 2 away and a bit in the open closer to myself. My opponent dropped his on a rock formation and behind a tree in the opposite side. He deployed Leia and a trooper squad near the far Vaporator. Two more Z6 squads were deployed in the middle and the Snipers and FD turret were near the edge closest to me, with the Snipers on a high rock formation. His pathfinders and Jyn both dropped in just on the other side of the building. 

Turn 1 saw him play Coordinated Bombardment and I played Voracious Ambition. I want to try and make sure I could let my own snipers take a shot before potentially getting wiped out right away. I was able to get a shot on and kill a pair of troopers near Leia. Bombardment killed a stormtrooper, the spotter from the Snipers and missed it's last shot. The rest of the turn saw everyone slowly moving forward but I was still trying to keep sniper fire to a minimum and keep the pathfinders from wiping out an activation. Turn 2 he played Rebellious while I just played a generic command 3 card. We cautiously moved around each other as I moved up to the middle Vaporator and he shuffled a pathfinder unit out into the open on the side away from me.  This is what ended up changing the game, as at the start of turn 3 i was able to blast that Pathfinder group out of existence with a bit of luck.  He had full Danger Sense dice from the previous round me getting a small shot off, and Duck and Cover.  But a Stormtrooper unit blew them away with a great Aimed roll causing 6 hits, and my opponent whiffing on all 10 defense dice.  The game wasn't over, since I still needed to move up to my second vaporator and he had fully damaged both of his.  The looming threat though of those pathfinders being relived though allowed for a bit more of an advance from me. 

Turn 4 gave me that opportunity to get forward, as my opponent turtled up a bit.    It allowed me to get a unit of storm troopers onto the second vaporator, and move my sniper into a spot to kill his sniper's spotter.  Essentially it left those units to be whomever activated first would kill the other one off.  I also was able to refresh my death troopers and nearly wipe out a Z6 squad with the long range weapons, and suppressing them to the point of being stuck.  This was doubly important since that squad was the one that could easily reach the Stormtroopers at the Vaporator.   He had countered though by knocking off almost all of the Snowtrooper unit and rendering them useless for anything besides hiding behind the building for the rest of the game.  Krennick also took several shots, but most of the damage was passed off with Esteemed Leader and the Royal Guards' Guardian.  Turn 5 I played Annihilation Looms, effectively locking down the board from units being able to reposition.  I killed his Sniper luckily, and then eliminated the last of the one trooper squad to secure killing off the most units.  I lost a ROyal Guard mini to guardian on a Krennick shot later on, but the rest of the turn went without me losing too much, and my opponent conceded after that due to not being able to get into position to kill enough units without losing his own to catch up on points. 

The game overall was a bit of a slog.  The terrain set up really hurt my list from being able to get forward at all, and the IRG was effectively just used as a meat shield for Krennick.  The Death Troopers were exceptional in their role as long range deterrent, and the refresh action wasn't necessarily the worst with Overwatch also there to help make sure standby could go off.  I'll likely play this list again on a different ma, where maybe there's a bit of better cover to get some of the units forward.

Saturday, March 31, 2018

Imperial Assault: Tournament Report

We had our little tournament that I had mentioned in this article previously, with a small turnout of just 4 players.  Its not too uncommon, and especially with Legion sucking all the air out of the room so we at least got to have a fun afternoon of three games.

In my first matchup, I played against Donovan who I think I have played in just about every Star Wars FFG branded game tournament I've participated in.  We drew Jabba's Palace, the map with picking up the crates that slow you down.  Donovan was running a Han and eRangers list that also had Hera, Gideon, 3P0 and Ko Tun.  I didn't get any practice time on this map with my list so I was a little worried, and as it turned out for good reason.  My opponent had initiative, and took the blue deployment zone on the map.  I decided I should try to shimmy down towards the rancor pit and avoid opening the door the first round to avoid unnecessary Ranger shots.  What I should have done however was probably just been more aggressive and move right in to try and do damage and use the Force Lightning from the Emperor.  He picked off a jet at the start of round two, and Han with Return Fire killed a Sentry after rolling two dodges.  I dropped my Riots into the pit to grab those crates there and help to rack up points.  However as the game went on attrition took its toll and I made a mistake with the emperor leavign him in a spot that several Rangers could see.  I had mis counted where he was at and that pretty much ended my comeback chance. 

Next game I played Brad on Nal Hutta, the shield mission.  Brad was running a Heroic Effort list with Leia, Asohka, Gideon, 3P0, Jerrod, Mak, Loku and Hera.  My opponent again had initiative, and took the Red Zone again.  He moved Mak up early to hold the shield on my right, while I moved my Riots to be in position the next turn to get to that SHield Generator.  He also moved Loku up to contest one of the coser center lane shield.  I decided to try some long range shots on Mak, and a Dodge and 2 damage was all I could get out of it.  I normally have moved my Jets in to take the Shield closer to my side on the elft, but I decided to be a little aggressive and have them move to the center to try and engage Loku, Hera and Leia.  I ended up killing Loku with some pot shots as I moved in.  I next used the EMperor to kill Mak with one of the Sentrys, but had to leave the shield to Leia.  Asohka came down and took the sheild near me on the left.  As the game went on I was able to kill Hera, Leia and Gideon with a combination of lightning and fly bys, while the Riots finshed off Jerrod.  I took the game fairly easily thanks largely to that big first round, and despite Brad's command deck just constantly stifling me with Intel leak and Comms Disruption.

THe Last game I played against Matt.  He was playing a janky list with Bantha, double eNexu, eClawdite, Jawa, Gideon and 3P0.  This was a tough list to play against on the Mos Eisley back alleys, because all of my figures get clumped together.  He took the indoor deployment zone, and I took the exterior one.  I moved my Riots up to my easily contestable crate, and then really tried to split forces as best I could.  The Batha moved down the middle, ending on the two center crates.  One of his Nexus made it down the hallway and got in quite a bit of damage onto one Sentry, and was able to cleave the other.  I thought I was in good position, but ater the doors opened he Jundland Terrored my troopers, and I made the mistake of having gone with my Sentrys to start my turn (to eliminate the Nexu and hopefully keep the Sentry alive. It had worked, except that the Bantha then stomped and killed a set of Jets and my officer in one activation!  Things looked pretty grim, but my Riots put some serious damage on the remaining Nexu, and forced it to etreat before I could kill it.  Then with my remaining Jets and the emperor I finsihed off the Bantha.  To start the next round, I tried to take initiative, but he negated it.  I was able to roll well enough though to keep my very wounded Jet alive through a Jawa attack.  I again made a misplay, when I should have left the Jawa alone and just focused on killing the Nexu, since the Emperor was nearby enough to just lightning him to death.  But the Nexu had just a single health, and I had forgotten about the Feeding Frenzy on the Nexu.  That allowed him to pull two wounds off and kill another Jet.  The emperor though finished off the nexu and put a little damage on the Clawdite.  His clawdite then moved over and finished off the last Jet.  The game ended in a tie then, but I had killed just one more point of figures to win the game on tie breaks. 

All in all it was a lot of fun.  The Sentrys were good but seemed a little capped on damage.  The Riots were darn near impossible to push off places that they controlled, and the Jets did Jet things.  Palpatine was solid, but I could never get enough damage on to tempt someone right then to finsih them off.  I think if I had practiced a it more on Jabbas I would have realized the aggressive play was probably better there, and in the last game I just had a couple of mistakes that thinking back on it I should have done differently.  Overall I went 2-1, and three of us all tied for first.  So a good afternoon. 

Tuesday, February 20, 2018

TRC-90 vs HIE-90

Since I have been super busy the past few weekends with birthdays and Weddings, I haven't actually gotten to play with any of the new goodies.  Thats lead to just a lot of thinking about some of the different upgrades, and inspired by a forum post I wanted to dig a bit into the TRC-90 vs HIE-90 numbers and some of their uses.

The TRC-90 has been a staple of Rebel lists since the upgrades introduction, and it was heavily favored with Ackbar lists to just dump out a ridiculously good amount of damage for just 51 points.  The errata that brought it to a single use didn't affect Ackbar fleets as much, but fleets that were used to putting in a minimum of 2 damage on two attacks with a double arc lost some oomph.  We need to do a little extra math to get how much damage we can pump out in a best case scenario.  Currently, out of the front at long range, you can expect to do 2.8 damage with TRC being activated, with 2 damage being the max from the side arc at long.  At medium range the front arc bumps up to 3.5 damage, and the side sits at 2.5.  Adding it all up, you end up at at about 4.8 damage from double arcs if you proc on the front arc shot and get a little something from the side arcs then at medium.  You also ping out for about 3.2 damage at long range. 

The Heavy ion Emplacements on the CR90 comes in at 3 points cheaper, but you lose all long range shots since you cant get Disposable Capacitors on board.  There is a 58% chance to trigger HIE from the front arc of a CR90B, and a little better than 43% from the side.  The damage output though at medium range makes up for it, pushing a total of 5.5 damage out of a double arc shot when using HIE from either the front or side arc.  The damage output though is a little misleading, since thats including the shields you've stripped from the side arcs.  The number moves down a little bit to 4.3 on just the targeted arc from a dual arc shot.


ConfigurationLong Range DamageMedium Range DamageBest Damage to single ArcDamage per Cost LRCost Per Damage Medium
TRC3.24.84.815.910.6
HIE0.05.54.3NA8.7

We should also consider though the drop off due to defensive tokens.  Wheres a TRC shot will get halved by a brace, you'll still be doing a minimum of 2 damage to the targeted hull zone and 4 damage overall with the HIE.  The HIE tends to also do pretty well against re-directs thanks to already pushing that 1 damage over, and again doing a minimum 1 to the targeted hull zone.  Both weapons do suffer greatly at the hands of evades though, since TRCs get cancelled at long range and re-rolled at medium, as will HIE crits.  The front arc of a CR90B has only about a 15.6% chance to roll more than 1 crit, so you're likely going to lose that crit on the re-roll. 

Overall I think the HIE90 will see a lot of time as a support ship in fleets that feature a bigger threat to go with it.  It softens up targets and is sufficiently hard to kill for just 48 points that plinking it and ignoring that decked out Admonition is going to leave you feeling very bad.  Its going to take planning though, and I think a little more dedication than a TRC90 does, since it just fits into every list so easily.  Both will have their place, but I'm going to be really pushing to try some HIE90s.

Tuesday, February 6, 2018

Star Wars Armada: The Fish Farm dilemma

For competitive Armada the last year has been dominated by just a handful of archetypes.  It began with Rieekan Aces basically taking every top spot at World's n 2016.  That began the 2+3 meta, a list building structure that emphasized a pair of combat ships and three flotillas with  lot of squadrons.  The typical build featured Yavaris and Gallant Haven to back a bunch of rebel heroes to just shred enemy ships and squadrons that approached.  This list was countered on the Imperial side by going to an extra activation by eschewing a second combat ship in the more popular 1+4 Boarding Trooper Avenger lists.  BTAvenger could survive the initial encounter with Gallant Haven, and typically one shot it and scoot before the Yavris B wings could activate and open up the ISD.  We've seen some further explorations as players continue to drop combat cable hips and squadrons to ramp up activations via flotillas.

This leads us to the current menace, the Fish Farm.  Several variations have popped up, the first at Worlds last year and later in an obscene showing at the Indianapolis Regionals, and finally with Intel Officer Luke of the Intel Sweep Blog racking up an impressive day.  The list specifics can vary, but it typically takes 5+Flotilla,s and MC80 HO variant with the Defiance title, and at least 3 VCXs.  THe list aims to out activate, outdeploy, and then out objective all opponents.  The list aims to go second, and then drag every Fire Lanes and Sensor Net token in, or just absurdly punish a target with Advanced Gunnery.  The obvious counter play is make them go first, and play an objective that would be hard for the list to compete in (like Contested Outpost, Most Wanted, or Solar Corona).  This has proven to be tough though as many lists have a good high bid (The Indianapolis list I believe was double digits) to ensure going second.  Its a well thought out list that its easy to see how it can easily pick up a ton of points.

The reason why I have a dilemma about the Fish Farm is that it breaks the game in a way that I really hate, but on the other hand it emphasizes Objective play.  On the brokenness first.  Flotilla Spam and Activation hi-jinks I think reduce a game that is excellent to a much more boring and un-thematic set of stand off shots.  Activation advatage has always been a key in Armada.  The first last Demolisher and Admonition torpedo boat lists (the first being the Clonisher build in the games first releases) relied heavily on having the First-Last combo.  Roll your havy hitter in, hit the enemy and get out before it could get destroyed.  I believe the reason that there is such umbrage now with this list, is the simple fact before the ships adding activations were combat capable.  The Raider and CR-90 are both ships able to fight and in spam lists are expected to.  The Flotillas now just are not combat ships.  At best they are getting used for blocking, but for the most part they hover around the edges of the game and simply exist.  The payoff as well for killing a flotilla is low.  18-25 points typically, on one of your roughly 12-14 attacks during a game is not going to allow you to close the gap fast enough.  Especially with the necessity of generating potentially multiple accuracies at range to harm them.  A majority of ships in this game feature three red dice at long, meaning a lot of the time you are leaving that flotilla with 0 hull damage.  Its a poor game design that made them far too point efficient in both activation padding and squadron activation that makes the a scourge I think for most lists. 

On the other hand, this list emphasizes one of the things that I truly love about Armada.  Objective play.  I think far too many lists are built only to try and kill off other fleets, rather than to use the unique objective system in the game.  Part of that I think is that the objectives do not typically generate enough points to justify trying to play them vs building a more lethal fleet.  Fire Lanes and Sensor Net though, now with Strategic available, make these objectives potentially worth well over half you fleet cost.  This list nails down exactly how to use them to generate alternative win conditions.  So I want to applaud this list for doing that.  And hence the dilemma for the Fish Farm.  Its a list that is just not much fun to play against, but it wins in ways that might just not be fun for the game.  I think honestly if instead of 90 points of flotillas it featured hammerheads noone would have an issue with it.  But as it stands now, the calls intensify for FFG to do something about the continuing Flotilla spam.

Tuesday, January 30, 2018

Imperial Assault Legends of the Alliance: A campaign wrap up and review

I have loved Imperial Assault Skirmish since the game was released.  I got another couple guys in my gaming group to buy in, and I've loved every minute of it.  The campaign side has been a different story.  I tried early on to start a campaign with my wife, but she hated it.  I had played as the Imperials, and likely was a bit too aggressive in how I played them.  She refused to play again after one of the missions I deployed a Nexu right on both of her characters and defeated them in a single blow. I have not given campaign much thought since.

This changed when FFG released the Legends of the Alliance App late this past year.  Its a co-op style mode for campaign play, where the App will tell you how to deploy and when to activate enemy groups, but you're in charge of moving them and rolling their dice.  You build the maps and move the figures around, with the app just helping guide whats going on.  Enemy units get some differnt special abilities, and their surge abilities and priorities change as missions go on.  My wife was enthusiastic to try this style of campaign, because she does enjoy playing games with me. 

I'll first review the current campaign without giving spoilers, which I'll leave to after the jump in case folks haven't played yet.  In short, this was a great intro campaign for the system.  The difficulty on Normal seemed to be just right for our two person game, and I'm not certain how a Hard campaign would go with just two figures activating.  There were some missions where there were a lot of Elite deployments out on the map and we struggled to kill them with our heroes (Dialla and Drokkata).  Midway through the app updated to add units from all units in your collection, and I felt the difficulty took a bit of a jump there.  Elite Jets are quite a bit scarier than a standard Elite Officer deployment that the game gave us several times early on.  The missions were fun, and the text only side encounters were short and had enough options to keep us intrigued during these segues.  The only real complaints I have are the item system and the overall campaign length.  To address the length, it was just far too short.  A handful of missions and I felt like I was just getting the hang of playing Drokkata, and the story was left a little bare.  As to the equipment, we just never earned enough cash really to buy the good stuff.  So I felt we were a little underpowered at different points of missions trying to gun down some of the more powerful units.

Overall I think it was a great first effort, and I hope FFG releases several more expanded campaigns shortly so we can keep playing.

******************Spoilers Below********************************

Sunday, January 28, 2018

Armada: Concocting with Wide Area Barrage

One of the best incoming upgrades for Armada is the Ordnance piece, Wide Area Barrage.  For a mere two points, you can deal several points of unblockable damage to a ship or squadron nearby your target.  This is another peice in Wave 7s anti squad buffing, that I think is important for how the game is going to behave going forward.  This is a direct assault on Carrier builds like Gallant Haven and Yavaris that love to keep squadrons nearby them.  It can also work to help kill those pesky support flotillas, since all the damage must be taken to one hull zone.

So what's our maximum damage that can be done?  Natively, its anything with 4 black dice in an arc.  The top maxes out at two, with 3 being possible if you are able to Concentrate Fire in another black die.  The only ship that can do this on its own is the Gladiator 1.  This is certainly not a bad choice, since Demolisher typically rides aboard a Glad 1 and this could be a way to earn more points back from a ship that faces a lot of hate any time it approaches a ship.  In the Max out at two damage natively, the Victory 1,Glad 2, Kuat ISD, MC75 Ordnance Cruiser and both versions of the MC30 can hit 2 damage with their 3 black dice with an arc, and nicely all have access to Ordnance Experts to help make sure to trigger it ( and ensure max damage).  The step down from the 4 black dice to 3 means a roughly 17% damage reduction on average for doing at least 2 damage, but we're talking 99% to 82%.  Its still likely to happen.  I think any one of these ships can take WAB as an option now, and it likely has the added effect of forcing your opponent to spread his fleet a bit more thinly.  THis makes the torpedo boats much more dangerous since they will not be facing multiple rows of fire when they make an attack run.

The Victory 1 and Kuat I do not think will pair super well here.  Both at close range are extreme brawlers, wanting to do huge spike damage.  The Splash damage just is not enough to really make it worthwhile, especially for the Vic 1 that is likely only getting 1 shot at that range with its big front arc.

We can also toss these on board Raider 1s, Torpedo Hammerheads, Assault Peltas, and MC75 Armored Cruiser.  The only ship that I could see reguarly taking this is the MC75, and even then the better option might be Ordnance Pods or External racks.  The Raider and Hammerhead are both just not taky enough to deliver potential multiple rounds of fire, and even with a double arc they are at best adding 2 damage on.  The Assault Pelta is another poor choice for these, since it has no way of re-rolling misses with its lack of weapons team, and its at best adding 1 damage.

Below here is a table for the average damage that each ship will do.  Remember, a decimal that's below .5 means it will trend towards the floor, while greater than will tend to hit the next integer up.

ShipAverage Splash from Best Arc
Raider 10.9
Kuat ISD1.6
Glad 11.9
Glad 21.6
Vic 11.6
MC-301.6
MC-751.6
Torp. HH0.7
Assault Pelta0.4

THis shows that on a one shot attack, you will typically be asking for 1 or 2 damage with a lot of rolls, but the Gladiator 1 dominates the field in consistency with OE re-rolls. 

Having hit the basics, there are some edge cases that could see some play.  Sato Fleets could really like this upgrade for a combination of long range critical effects, and a chance to do a max of 5 splash damage.  Using either MC-30 could allow a Sato player to throw 5 black dice on one attack, dealing 3 splash, and then follow up with the front arc with a CF command to basically guarantee another 2.  That kills Jan Ors, Luke, Biggs, and most other mainstay aces in one fell swoop, as well as piling up the damage on the target ship.  Gladiator 2s I think could also see a slight resurgence, since you can do max damage regularly, and the added Blue die for flacking makes them extremely well suited for killing squads and carriers in a pair of activations.  The MC-75 is also likely one of the best bets for this, since it can pair WAB with one of the either dice adding ordnance upgrades.  External Racks is probably the best pairing, for cost and the fact that if you put expanded launchers on it noone is going to allow you to get the front arc on it.  The mC75 also gives the chance for 5 splash damage in an activation.


Sunday, January 21, 2018

Battle Report: Dodonna Liberty vs Dual Glad Squadrons

In likely the last game I'll be able to get in before the launch of Wave 7, I decided it was time to try out some of the new Rebels faction ships I received as gifts n the last portion of the year.  I wanted to try out the Liberty, but I wanted to try something a little different from the typical Madine lists I've seen posted online.  It does however need the extra mobility that Madine can allow, so I decided to toss Nav Techs and Raymus on board.  Its a little bit more expensive than just running ET, but it lets me either jump from 1-3and back again, or gives me some supreme mobility.  I paired that with a Salvation Neb, and a TRC -90.  I also had a pair of Transports, one as the combat retrofit.  I had never run the combat version, but several folks on the FFG forums swear by using them with Torryn Farr on the regular version to provide re0rolls on AA fire.  The plan would typically be to use the MC up front and follow up with the Neb, allowing the transports to shield the flanks from squads and the 90 to flank.

Here's the full list

MC80 Battle Cruiser (103 + 64)
+ General Dodonna (20)
+ Raymus Antilles (7)
+ Gunnery Team (7)
+ Leading Shots (4)
+ Nav Team (4)
+ Spinal Armament (9)
+ XX-9 Turbolasers (5)
+ Mon Karren (8)
Nebulon-B Support Refit (51 + 12)
+ Dual Turbolaser Turrets (5)
+ Salvation (7)
CR90 Corvette A (44 + 9)
+ Turbolaser Reroute Circuits (7)
+ Jaina's Light (2)
GR-75 Combat Retrofits (24 + 5)
+ Leia Organa (3)
+ Comms Net (2)
GR-75 Medium Transports (18 + 9)
+ Toryn Farr (7)
+ Bright Hope (2)
Shara Bey (17)
2 x YT-2400 (2 x 16)
A-wing Squadron (11)

My opponent was a good friend of mine who was running a Dual Gladiator, Dual Raider squadron fleet.  I've played against it several times, so I knew off the top that while the Gladiators can be trouble, the Squadrons are how this list wins.  He ran Maarek Steele, Jendon, Rudor, Gamma Squad, Tempest Squadron and a generic Phantom.  This list is great against fighters with a lot of high hull killers, and then they're very good at plinking ships down so they're damaged by the time the Glads close in.   

We played Contested Outpost.  From the outset I positioned things poorly.  He ended up placing his Gozanti and a Raider with the squad compliment on my far right, and Insidious and the other Raider on the far left.  I had the Neb and transports pointed at the station in the middle, and the (0 on the far left running a little off parallel to my edge.  The MC80 ended up on the far right, with Demolisher set a little closer to the middle.  My thought with the 80 had been at speed 3 I could potentially one shot both the Raider and Gozanti and either force Demo to turn hard to deal with it or risk getting caught from behind.  The plan started out poorly, as his gozanti quickly turned hard to stay far away from the MC80, while the Raider withstood a full blast at medium Range on turn 2 with a single Motti hull remaining.  He slow rolled Demolisher and moved the squads in towards the station.  On the far left Jain'as light was in a run for her life from Insidious and the Raider, but luckily with our activations being equal I was able to never allow Insidious to take the medium range black die shot and the Raider couldnt activate at the right tempo to catch it.  My squadrons were able to get in and kill the phantom right away, but I ended up losing Shara Bey in the exchange.  At that point though, the transports were able to start whittling down the remaining squads, with some hyper efficient rolls.  Torryn boosted blues are no joke. 

 The Transports also helped to block Demolisher off from Salvation, but it didn't end up lasting long after it was able to scooch past them a turn later.  In a couple of turns I ended up losing Salvation and the 90, trading in for the Raider and a bit of damage on on Insidious and Demo.  The transports were able to finish off all but Valen Rudor and Jendon for his squadrons, while Mon Karren made the hard turn to start putting shots onto Demo.  Luckily for me, because of Demo's angle to chase down Salvation and the 90, he ended up having to be in range of Mon Karren, who promptly destroyed him, killing Motti as well.  That ended up popping the one hull raider, and the one hull Gozanti as well!.  From there Demolisher ran off and I spent a round sitting on the station picking up some extra points.  

In the end I got a little lucky in a few choices by my opponent, but I did enjoy very much the ability of the Liberty to dance some circles Nav Techs and Raymus.  The transports did their job exactly as well.  The Neb continues to support that it likely is best used as a carrier rather than a combat ship, as long as torpedo boats continue to remain popular. 

Wednesday, January 17, 2018

Armada early unboxing!

Thanks to the great job Crabbok does of covering Armada, FFG have him some early copies of the Profundity and Chimera expansions which he unboxed for us!  Let me start by saying the models in the videos look just fantastic. The Chimera paint job is awesome. We also learned the Raid effect can be cleared in two ways. The first is to have a token of the matching type and discard it, or to discard your top command dial to remove all Raid tokens. This makes it a far more palpable mechanic I think vs the worst case thinkers where you were locked out of a command forever. This possibly also means token generation becomes more important. So Garm Bel Iblis and Moff Tarkin might see more table time.

Let's work our way through all of the new upgrades that we got revealed.  Sorry for no pictures on this, at least until the wiki gets updated. 

Neutral:

Strategic Advisor: 4 Points, Large Ship Only, When it is your turn to activate, exhaust this car to pass your turn. This is probably one of the biggest upgrades to come in this wave.  The pass mechanic rules have been hotly debated, but FFG as found an elegant way of letting ships that feature a large ship keep up in the arms race for activations.  In the officer's slot there is a bit of competition in both factions, but I think we'll see the advisor fairly often over running a third Gozanti or transport.

Early Warning System: 7 Points, Defensive Retrofit, At the start of each Ship phase, you may pick a hull zone and place a chaff token.  Attacks against that hull zone are obstructed.  Remove the token at the end of the Status Phase.  A huge boon for ships of all sizes against squadrons especially.  A bunch of Bombers parked in front of your ISD?  Chaff makes them all move and allows you to likely get away instead of overlapping.  This also puts a crimp on ships trying to plink away at damage from afar with one or two red dice.  

Hardened Bulk Heads: 5 points, Offensive Retrofit, Large Ship Only.  When you overlap or are overlapped by a ship of a smaller size class, deal one fewer facedown damage card.  ISD brawlers are going to love this if they aren't taking a boarding team (Kuat's likely?).  ET MC80 Home Ones will also love to ram your Vic 1 twice and take no damage from it.  This is going to be a fun one I think.

Heavy Ion Emplacements: 9 points, Ion Cannon.  On a Blue crit, exhaust this card to deal one additional damage to the hull zones shields, as well as 1 damage to each adjacent hull zones shields.  I'm excited and twining at this card.  Interdictors I think will love it to add more bit to their barrage, and with D-Caps they get it at long range!  Sadly though, it has no effect the target ship has no shields in those hull zones.  And its 2 points more expensive than ACMs that are always effective.  Maybe it could find a home in a Sato MC80 Liberty Star Cruiser variant, where the Mon Cal weapons team can re-roll all those Blue dice?

Ordnance Pods: 3 Points, Ordnance, Medium or Large Ship only.  At the end of your attack, you may exhaust this card and perform an attack from a  hull zone with one black die against squadrons, even if you have already attacked.  Oh boy, this is a fun one.  Similar to Impetuous, but you get the whole arc to sweep with a black die.  MC-75 likes this, Kuat probably likes it, and Vic 1s I think love it.  With the last several waves having such a boost for squadrons, this is an excellent boost to flak that has been sorely needed.  If you have Ordnance Experts, this is basically an extra damage to everyone each turn they stay in range.

Imperial Only:

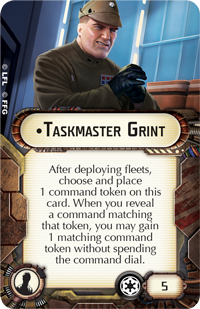
Soverign: 4 Points, ISD title.  At the start of the ship phase, you may exhaust this card to discard 1 command token from up to 3 friendly ships at range 1-5.  If you d, those ships gain a command token of any type.  Of course Tarkin's flag ship helps with tokens.  Does it make Tarkin good enough to take as a commander?  Maybe.  But it certainly helps with matching up the correct Raid token.  It competes with several other very good titles though, so we'll see if it gets any use.

Captain Brunson: 5 points, Officer.  While defending at range 1-2 of an obstacle, you may exhaust this card to cancel one die.  This is a niche use officer, who might see some play in a fleet that is running Interdictors or Salvage Run as an objective.  Overall though she might be tough to use.

Instructor Goran: 7 points, Officer.  While a non heavy squadron is at range 1-2, it gains Counter 1 or increases its counter value by 1.  An interesting boost for fleets that might use a smaller fighter cover to help kill more stuff as a road block near a ship, he could be paired with Stronghold to make those TIE Fighters far more prickly to punch through.

Gar Saxon: 23 points, Gauntlet Fighter, Brace, AS of Blue Blue Red, Anti Ship Blue Black, Assault, Rogue.  When an enemy ship with Intel or Relay at range 1 activates, they take 1 damage.  Holy crap.  This guy will likely find himself a place in a lot of smaller squadron fleets for his ability to help shut down Relay ships very quickly.  Assault is better with Blue Black, since you still have a chance at damage as well. 

Rebel Only:

Aspiration: MC-75 Title, 3 points.  When you deploy, you may move shields to up to 2 hull zones from other hull zones.  The maximum shield setting is 6, and you cannot regenerate shields while any hull zone has more than its typical maximum.  This is an interesting title, especially with Admiral Raddus on board.  You deploy the MC-75 late, and beef the facing hull zone shields up to max to keep from getting edged out.  Its not a must take title, but I like it.

Bail Organa: 7 points, Officer, Medium or Large Only.  After deploying, pick a round token.  At the start of that round, if you are second player you must activate first.  If you're first player, gain 2 command tokens.  The counter to Governor Pryce, Bail has you jumping the order of everyone else.  This could be the key to getting out of an arc early, or whacking a couple of ships before they escape.  Like Pryce, he telegraphs what you want to do, and going first can be more dangerous than going last a lot of the time I think because you don't know the board state as well.  But, with Raid, the chance at those tokens is nice.  

General Draven: 3 points, Officer.  While attacking a squadron with Counter or Intel, add 1 die of any color to the attack pool.  The Kallus of the Rebellion!  This is going to be a bit of a heavy hitter I think, largely because Jan Ors is so powerful for rebels, and the aforementioned Imperial officer that adds counter to everyone.  Its a big blow against Sloane lists as well, and the typical favorite A wing Aces of Shara Bey and Tycho.  

This wave is going to likely mean a huge meta shake up, with new Raid mechanics and passing abilities with activation shenanigans.  The Gauntlet fighters will likely ensure squads being a must have, but there's a lot of squadron hate going on there so it might mean a medium fighter CAP is now the best way to counter those Aces lists.


Tuesday, January 9, 2018

Chimera Preview: Still a lot of questions

FFG has been on fire here, pumping out article after article, for us.  This one though, I think is missing a few too many parts.  We got a few answers that I'll look at, but we're still missing almost all of the officer slot upgrades as well as any of the possible new ordnance or turbolaser upgrades.  Possibly the one that I'm most interested in is the Early Warning System that might give a bit of real relief from some of the more fighter heavy 2+3 builds.

We did however get to see some very good stuff.  The biggest item is definitley the new fighter that has been dancing in our heads, the Gauntlet Fighter. 

At 20 points its a hefty investment, but the new Raid mechanic (Delivered via the Assault Mechanic here) is going to potentially be game altering.  Being able to stop a carrier from being able to execute squadron commands, or an MC30 from hitting the gas with a Nav is going to likely be very sought after.  It is speed 4, with 7 Hull so its no slouch at absorbing fire.  Its anti-squadron capability is a little rough, giving about a 30% chance to do 1 damage, and 30% to do 2.  We'll likely see Majr Rhymer make a return, helping to expand the threat range of these fighters and the Raid mechanic. 

We also got to see the parallel to the MC Exodus title in the last preview, with the 7th Fleet.  Being able to mitigate a damage is good, but as we've seen with other Task Force titles, you need numbers to really make it work.  I'm also a bit worried that the its fairly easy to mitigate, by just getting out of arc.  Vics have always had trouble with flanking, and ISDs can be open to attacks thanks to the large base. This though might help find a home for Dual Vic lists again, paired either with an lightly kitted ISD or with a couple of Glads so you get one extra title carrier in there. 

Finally, we see Taskmaster Grint. 
He's a slightly less powerful version of the Rebels Raymus Antilles.  He'll find a home though on Quasars where they want to always be using Squadron commands, and any ship that might benefit from extra engineering points (JJ Victories maybe?  Interdoctors?) 

Overall this preview was a little bit of a let down, especially since it didn't explain Raid any further or give us the other titles or officers.  I wish FFG would give us everything so they can see potential issues earlier.

Wednesday, January 3, 2018

Armada Profundity Preview

Fantasy Flight Games gave us a spoiler preview of the Profundity expansion that's coming in wave 7.  It didn't give us all of the details, but it provided some excellent pieces to think about going forward.

The spoiler gave us both versions of the MC-75, the Armored and Ordnance versions.  For 104 and 100 points, we get a ship that has 4-3-3-3 Shields and 9 hull.  That is the best the Rebels currently have to offer, in a package that provides a lot of dice.  The side Arcs have 3 Reds in either version, and either Blue or Black.  The Front Arc is 3 Blue or Black and the rest the other depending on the type.  This is a good set up.  Both ships have a full suite of upgrades, with offensive and defensive slots, as well as weapons teams.  The ordnance version is especially intriguing due to it being the first double ordnance slot ship.  That could mean Rapid Reload and APTs, or the newly spoiled Wide Area Barrage for really punishing ships hanging around your target.  Its also going to possibly be a real killer for Gallant Haven Builds, which rely on keeping the fighter screen close by and having Jan Ors protect the escorts.  The ships maneuverability is on par for a large base ship, so it shouldn't have an trouble at Speed 3 of being able to run down fleeing ships.  The ships true downside does come in the shear number of upgrades it looks to cry out for, as well as the defense token suite.  The tokens match the Interdictor, which means a single accuracy can really lock down your tokens. 

I'm very excited for this ship. I primarily play Imperials, but I've been trying to make a Sato build really work.  This ship will fit right in with Sato I feel, since it can do both long range crits and in close range just chuck a huge number of black dice. Its also going to be very tough with a couple of other Mon Cal ships with the new Mon Cal title

Also spoiled was Jyn Erso, a boarding team that introduces a new mechanic: The Raid Token.  Raid Tokens will stop a ship from being able to execute a command that matches the token, so if you're a carrier you're unlikely to be able to be commanding squadrons any longer.  This also is likely to be the new action that we've seen on images of the Mandalorian fighters that are coming in the Chimera pack.

This is a very exciting wave I think that we're about to get.  Hopefully it comes sooner rather than later.

Tuesday, December 19, 2017

New Armada FAQ thoughts

FFG surprised the Armada crowd yesterday with a quick release of a new FAQ PDF with some new goodies for us.  I'll break it down into major and minor updates.

Major Updates

  • Raddus Bomb: In a nice preemptive move, FFG cleared up the questions surrounding the upcoming General Raddus and Profundity upgrades.  The gist of the Raddus bomb had been if you could deploy all your ships into Hyperspace Assault and then pop them all in using the new upgrades to really surprise an enemy and limit your losses significantly.  The answer is no, you must have at least a ship on the table.  Things can still work though if you have just a single GR75 hanging around and then pop everyone else out.
  • Thrawn Preemption: Another preemptive update for Wave 7, FFG rules that you won't be able to use Thrawn's dial plus a matching dial from your command stack.  So no 10 squad activation from an Expanded Hangar Bay Quasar.
  • Commanders Work if not Deployed: This had been a question before, and FFG has cleared it up.  Commanders and upgrades work outside the game, as long as they aren't missing their timing window.  So an Interdictor with Grav Well Projector wouldn't work in hyperspace since its missing its window.
  • Sloane Defense Token Clarification: There had been some question as to whether or not Sloane still allowed a player to spend the defense token she targets with the accuracy result.  The answer is no, you cannot. 

Minor Updates

  • Targeting Beacons Nerf: I have only played this objective once, and I'm unlikely to ever play it again now.  The ruling made it so you could only resolve one token on an attack, making it not even worthwhile to stack the tokens nearby to get multiple re-rolls.
  • Armed Station: The Armed Station cannot obstruct itself, so it can actually shoot ships and fighters that are overlapping it.
  • Leia Tokens: In a not surprise move FFG also reiterated that you cannot spend a physical token in addition to using Leia's token while resolving a command.
  • Jendon Attacks: In what isn't a surprise, FFG ruled the extra attack a fighter can get from Col. Jendon does not receive any boosts from Flight Controllers or future upgrades.  
  • Admiral Screed: In what could become a major rule change with the right upgrades, Screed was ruled to be able to use his ability during any activation.  Currently the only case of this would be if you used Quad Laser Turrets.  But it does open up the space for a potential Overwatch type effect.
  • RLB and token: Rapid Launch bays can only set up as many squads as you can activate, so using a token lets you do 1, not your whole squad value
  • Luke Skywalker: Someone must have tried some dumb shenanigans, since this ruling really wasn't needed.  If a crit effect like Shield Failure occurs, Luke's ability in RAW could mean you wouldn't take any damage.   
  • Flechette Torpedos: This question stemmed from a dumb argument months ago.  Flechette Torpedos toggle you activation status, but they do not just end your activation (another Quad Laser Turrets issue). 
  • CC Commaders: Geneal Dodonna received a slight nerf to his ability in the all out offensive, where you need to pick one opponent to use his ability against. Admiral Konstatine got a slight boost though in that both players can use his ability.  
This was a good FAQ I think.  Its a good sign FFG was out front on several upcoming wave questions, and that they cleared a backlog of questions. 

Thursday, December 14, 2017

Star Wars Armada: Governor Pryce thoughts

With football season winding down, my focus has started to move back towards my gaming group and actually getting to enjoy some of the games (Do not fear, NBA and NCAA Rankings are forthcoming shortly).

IN Armada, we've finally started to see a slow drip of news, this week with the coming form of Governor Pryce.  The wookiepedia article linked gives a basic overview of her character form the Rebels TV show, noting how determined she is to get revenge at some points and how well she plays the polticial game.  This I think fits her ability quite well:

She forces a medium or large ship to activate last in a pre-named round.  This is a truly huge possibility for making sure your BT Avenger gets to first last its target, or that your Quasar gets in a late alpha strike against your opponents fighters or a careless flotilla. She is also good for either pushing back the engagement by forcing your opponent's typical first last ships to wait an extra turn on their attack run or risk getting stuck in a double arc.  Your opponents will have to play around that moment in the game.  This could be very good for contested outpost or salvage run where you can grab an extra turn of objectives by threatening a specific area.

I think a few Victory builds might want her, where she might help battle carrier Vic 1s make an alpha strike and wait for that opposing ship to jump into close range.  A pumped up Vic 2 might also want her for a bit of a surprise on turn 2 if your opponent plays an aggressive list or to help deter them from rushing an objective.  But I do think the ISD is going to be the one that really wants her.

The ISD platform also helps to make up for the drawback Pryce presents for a player, namely that your opponent knows in which round that ship must activate last.  This means they know they can set up an attack run from Demolisher or Admonition and get away without you necessarily getting a shot. Luckily an ISD is a tough nut to crack, so that helps.  I also believe it is going to be key to pair your ISD with some escort ships that can take advantage of ships trying to jump in til near the end.  Victories can punish ships trying to skirt around and out-wait the ISDs activation.  The Interdictor can bring in a targeting scrambler and keep the ISD up, especially if you are first player.  It also might help to bring back some of the Rogue units the empire has, specifically the Decimator.  Any ship getting close enough might be eating a few three blue dice attacks. 

I think Pryce is going to be one of the high skill use cards.  Her exact usage is going to take the right combination of objectives and builds to make work.  I'm excited though to test her out a bit, and see what she can do to help battle the activation advantage.

Wednesday, May 31, 2017

Is the Victory 1 Star Destroyer Obsolete?

With the continued spoiling of Armada's Wave VI, we got the full specs of the Quasar class Carrier for the Imperials. The Quasar was seen mostly in the Star Wars Rebels animated show.  This new expansion is designed to give the Imperials something they've had already in their Victory Star Destroyers, but at a much more points efficient 54 or 61 point varieties.  The Quasar come standard with at least one weapons team and one offensive retrofit (double depending on the variety you choose).  Its native Squad 4 is the same as an ISD, and can easily be pushed to 5 for still just about half the points of an ISD1.  The titles for the ship are extremely synergistic, from being able to pull out a squadron command when you need it to obstructing every attack thrown at your Swarm fighters.


This of course, plays directly into the obsolescence of the famed Victory Class Star Destroyers, type 1.  The VSD comes standard in the Core Set for the Imperials, and for much of Waves 1 and 2 was a workhorse.  Not ever being super points efficient, 8 hull and good shields with Weapons Team slot and Offensive Retrofit made it the go to Imperial Carrier if taking the VSD1 variant.  The VSD2 has always lagged behind because of its cost, but it might see some time in the sun again following the release of Disposable Capacitors as a long range fire support ship. 

The VSD1 could take a beating from enemy ships and squads while still continuing to hand out squad commands, and when timed right had enough Engineering Points to keep itself on the board in crucial moments. However, kitting one out as a carrier racked up the points quickly, and for a ship that without the skilled commanding of Moff Jerjerrod could not keep its front guns pointed at the enemy without spending precious commands navigating, nor could it use its class leading 3 black dice easily.  It also didn't help that players typically had to forgo upgrades that would help even out the fickle Red Dice the VSD1 had at range to get the max from its carrier abilities.  Now we get the Quasar that could potentially have Flight Controllers, Expanded Hangar Bay, Boosted Comms and the Stronghold tittle for just 2 points more than the naked VSD1.

Even the Card art has it getting blown up

The Quasar suffers some of the same drawbacks the VSD1 has, namely if kitted for carrier duty it loses a lot of its chances to be a more efficient combat ship. It cannot take some of the better Weapons teams upgrades if its looking to up its fire rate (Gunnery Team) or even out its dice rolls (Veteran Gunners).  It also lacks the VSDs staying power, with its rather abysmal defense token suite and the low amount of shielding.  This one hurts since its unlikely to ever be able to really use its Boarding Teams upgrades before it gets shot up on approach. These drawbacks though don't really tilt things towards the VSD1 for maintaining its primary carrier roll.

If the VSD1's days of being the main fleet carrier, what role can it fill?  It still is a survivable gunship, and has a solid 3 Squad rating.  There is a chance with the External Racks upgrade that is forthcoming it could again work as a very good area denial piece.  But that's a niche role going forward, since the Gladiator fills a similar role for a relatively equal price and is more efficient of  a killing machine for the points..  It also is not nearly as good as say an Arquitens and Gozanti Cruiser for the same price in terms of fire support and overall fleet composition. 

Perhaps its lone spot will be with the Quasar, as the tank to soak up approaching fleets shots, and equipped with Veteran Gunners and Dual Turbolaser Turrets it could effectively support bombers with long range shots that hurt.  Its just not likely though that the VSD1 will see much time on the mat following the Quasar's release.

Monday, March 27, 2017

Corellian Conflict Campaign Thoughts

So, we were able to conclude our Corellian Conflict Campaign with the Imperials striking forth a solid victory, winning the last four matches to get it after winning just three in the first eight.  It was a tough fought campaign, and was a whole lot of fun.  My group and I are really hoping for another campaign setting in this next year for the game, since it was such a different style of play.  Going to 500 points as well allowed a lot of flexibility in fleet building, and really let the Interdictor shine as a ship.  The home rules we came up with I think all worked well, and I really enjoyed the thematic hyperspace rules.

Our group never really found any issue with timing (besides my third round game with my friend who sat his MC80 Liberty at speed 0 until Turn 4 to avoid engagement).  We still stuck in our typical roughly two and a half hour time frame for casual play.  I honestly think I could see this becoming a much more popular format for tournaments without having to change the length to a great degree.

As to actual game play, things were a little mixed.  Diplomats were basically useless in our four person game (2v2).  It helped to keep a few of the high cost  systems out of hand but it didn't make a huge difference. Skilled spacers as well was just a little disappointing because of its lack of use. However the spy net was awesome. My campaign partner used it to great affect when he defended Corellia by baiting some really bad deployment from his opponent and then shifting out of it. I cannot say how great spy nets are. The repair yards likely helped keep the least experienced member of our campaign in it, because he lost several ships every game. They are probably the most important areas to control.

We did find the base assault missions to be brutal. Fighter wing is a huge boost especially to rebel bomber fleets, as grabbing either 3 A wings and a Z95 go help fight in or 3 more Xwing squads to do some extra bombing work as well almost turned the game against me when I was attacking Sabehering. Planetary Ion Cannons was beastly. The regular objective is tough, but with Intel in the base defense version you can routinely get a four blue dice attack almost every turn.

The only thing we found that really didn't work though was the money system scaling.  With three players per side, the money seems like it would be a little tight each turn.  With just two though, after a couple of conservative rounds I had my fleet to 500 points and was starting to rake in extras.   It just didn't ave the tense feeling I was reading about in some other people's games. 

Saturday, March 18, 2017

Armada Campiagn Narrative Rounds 5 and 6

Task Force Zekkog moved slowly through the Sabhering Asteroid Belt, searching for the Rebel base that existed therein.  Tiaan's ships had been dispatched to try and root out the intrusion, since the ISB had reported an extensive ship works there.  Striking this resource rich area would certainly go a long way to reducing the rebel threat in sector, and allowing the Imperial Navy to drive them out.  Tiaan's ships had spread out to navigate the dense set of asteroids and to try to detect the rebel presence better.  His sensor teams were straining with the amount of metal and background radiation in the belt to find anything that could be a base.
Several hours later, Tiaan was awakened by the chirp of his comm system.  "Sir, we've got the Rebel base ahead.  Their defense fleet is moving out to intercept us."  Tiaan replied "On my way.  Order fighters launched, and prepare the grav shift to clear the asteroids for us."  Moments later Tiaan was on Unforgiving's bridge, ordering his forces into some semblance of a firing line.  The Rebel fleet and the asteroids had already prevented him from being able to cross the T and bring his best guns to bear and keep the Rebel broadsides from firing into his ships. So Tiaan decided to try and catch the enemy in the rear, shifting Khopesh and Obedience from their positions to his right into a more trailing position.  He had to be conservative with his fighters here, because the base was able to provide more ample fighter coverage than the opposing fleet could typically. The rebels knew this and their fighters dove in quickly as the broadsides began to hit the spread out Imperials ships. The Imperial fighters got the better of these rebel pilots early on despite some losses. Obedience though was getting battered by successive waves of ship fire. It had been positioned poorly to start the battle and was taking the brunt of fire from an MC 80 cruiser. The firing teams on board Obedience had decided to first destroy a set of support vessels that were coordinating the enemy fighters. Tiaan could see the wisdom but feared that not doing enough damage to the  big flagship.  The rebel transports were obliterated by the carrier's turbolasers.
 
As if on cue though, the big rebel flagship let loose a debilitating line of fire into obedience, as the older carrier tried to also avoid the large asteroids that had ambled into its path. The combination turned deadly as one of the larger asteroids struck shielding conduits. Unforgiving's engineering crews began extending shields to the carrier to help overcome the damage. Due to positioning Obedience was still taking a majority of fire.  Its shield capacitor had become misaligned, so a majority of the ship had become vulnerable to fire.

The CR90 that had been trailing its flag ship had maneuvered into a perfect position to add fire to the now crippled Obedience.  The targeting scramblers onboard Unforgiving weren't going to be able to protect it from that fire at that range.  Tiaan feared he'd lose the carrier and perhaps the tide of battle would turn.  But, in front of him he saw a flash of steel as Khopesh sped across into the teeth of the Corvettes fire, shielding Obedience.  That stroke of brilliance would have to be rewarded Tiaan thought to himself.  Unforgiving was able to add its fire into the corvette and drive it away from the carrier, as the Imperial fighters continued to best their rebel counterparts.  With the extra time, the engineering crews had been able to get the shield capacitor back into working order.  The rebel commander must have suspected the battle was turning against him, because they broke off their engagement and scattered themselves into the Asteroid belt.


Epilogue

The Imperial forces were now firmly in control of the area, and set about decomissiong the Rebel base.  The Rebels had left scant bits of Intel, or usable parts, but the docks there allowed Obedience to get repaired quickly.  The rebel fleet poked around their former base, probing the Imperials for the next few weeks.  But with their fighter losses in the previous battle, and Unforgiving's grav shift throwing debris and rocks into the mix, forced them to withdraw.  Tiaan heard through the holonet news that Motti had won a resounding victory against another rebel fleet above Correlia, and then had pursed them to Corfai where has able to dislodge them.

With these victories, it appeared as if the rebel threat in the sector had been pacified, and that Tiaan would be moving on to a special assignment as a reward for his work here.  A star base command that would potentially change the universe and end this horrid rebellion.

Thursday, February 9, 2017

Correlian Conflict Round 3 Narrative


Unforgiving exited hyperspace at the edge of the Selonia system.  Grand Mofff Jerjerrod settled himself as he saw the oceanic world appear before him.  This would not be a repeat of his last failure, he told himself.  This mission was all about stalling the rebel fleet stationed here from being able to aid the raiding fleet at Corfai.  The ISB agents had truly hit on a bit of treasure this time, capturing a rebel sympathizer who just happened to have fleet movement details for the rebels in this sector, including the locations of several rebel encampments.  The information was not complete, but it did state that General Dodonna would be leading an assault against the system of Corfai, and that Commander Sato was holding a fleet at their newly built outpost at Selonia.  That bit of information Tiaan already knew, as he recalled that initial engagement.  The Imperial forces commanded by Admiral Motti had been diverted to set a trap for Dodonna at Corfai, while Tiaan’s Task Force Zekkog was being sent to keep the rebel reinforcements from being able to come to their aid.  

“Sir, the Ion cannon emplacements are just where the intelligence indicated they would be”, the tactical officer informed the bridge staff.  “Also, we have a positive sighting on the rebel forces.  Their fighters are staggered far away from us, with an MC80 liberty variant and two Nebulon B’s in support.  They’re firing engines, and coming around towards us.”

Tiaan was grateful the fighters were far out of their approach path.  Commander Sato was renowned for skillfully using fighters to open up ships to extra fire from his capital ships.  “Prepare for use of the Gravity Shift technology,” Tiaan said.  The device was amazing, and he had been having his crews train with its use extensively since it had been installed on the Interdictor class ship.  
“Fire.”  
The asteroids in front of his fleet suddenly stopped their current slight spin towards his fleet, and instead were moved into the path of the oncoming rebel force, causing them to have to slow and turn to avoid a dangerous collision.  

The flight commanders ushered forth the large squadron force Tiaan had built up especially for this mission.  Quickly, several Lambda class shuttles were ushered forward with elite strike teams of ISB agents to put down the Ion Cannon platforms.  It was essential that these teams carried out their work before the fleet moved into position, and give them a chance to wreak havoc on the ship's defenses.  

“Getting the all clear from all teams sir, they’ve been able to neutralize the crews,” the comm.’s officer informed Tiaan.  “We are clear to head in.”

The enemy fleet had slowed down to a near stand still on the far side of the asteroids.  Tiaan knew for his mission to be a success, he had to force an engagement.  “Order Khopesh and Obedience forward at best possible speeds.  Keep Halberd on our left flank to scare off any of those fighters,” Tiaan said.  Orders went out, and the ships all moved.  The rebel fighters were finally getting close enough to their main fleet that they might have become an issue, if not for the wall of TIE fighters blocking their path.  Khopesh’s movement to the flank of the MC80 must have worried the rebels, as they moved several squadrons of Xwings into range to protect it.  

Khopesh slowed its speed to be able to stay out of range of the bombers, and fired a small broadside into the MC80’s flank.  The tactical readout showed it was an excellent shot, knocking out the shields on that side.  Obedience moved forward to press the advantage on that side, and was able to do damage to the other shield sections.  That fast movement though had allowed a small flight of A-Wings to get close to Obedience, and Liberty took the opening to do severe damage to the shields on the Victory Star destroyer.  “Get the Shield generator going, and maneuver us into position to use the new targeting scramblers on that ship!” Tiaan ordered.  The targeting scramblers were a powerful piece of technology, temporarily blinding automated targeting computers and making so many turbolaser shots go wild.  Unforgiving’s unit though was a massive power drain, so it could only be used after a lengthy recharge period.  It also had a very minimal range effect, so the ship using it had to be close to the action.  As Obedience tried to slug it out with the larger star cruiser, one of the Nebulon Bs began firing as well, although to little effect since the MC80 was between them.  With the rebel fighters largely still out of position, the fighter wings began taking attack runs on the MC80, trying to help overload shield generators.  They were to almost no effect though as the Obedience closed on its quarry.  It was badly damaged, but finally was in range to fire its armament of missiles and torpedoes at its adversary.  The resulting damage could be seen from Unforgiving’s command deck clearly.  “Order all fighters and bombers not currently engaged to fire at that star cruiser,” Tiaan called out.  If he could bring down this star cruiser, possibly even killing Commander Sato, he’d likely be able to route the rebels from the sector.  

The Gozanti carriers that trailed the fleet helped pull the weight of coordinating all of the attack runs from Obedience, which was now suffering from sever damage.  Its engines had taken a severe amount of damage, and the ship was still receiving fire from the damaged Liberty, as well as a small corvette that had appeared.  However, nothing seemed to be getting through the thick armor of the enemy flagship, as nearly every bomb seemed a dud or ineffective.  

Obedience had ground to a halt and was being overtaken by the swarms of enemy fighters.  The captain informed Tiaan that the engines were still functioning enough to jump to hyperspace, and the Moff grudgingly obliged the request.  It would already take weeks in dry dock to get his carrier serviceable again, and letting it go down with all hands in what was supposed to be a diversionary raid would not look good.  

With the Victory now gone, the liberty turned its attention on Halberd, which had been continuing its course along the exposed flank.  The engineers running the targeting scrambler fired the unit again, and the shot that might have destroyed the small Raider went wild, doing some damage to the shields.  The Raider returned fire, and the Liberty sank to a crawl.  The guns from Tiaan’s ship added no effect as he entered into range.  Tiaan ordered one last bombing run at the damaged MC80, to try to put it down.  However, the shots missed the mark as all of the fighters were being recalled.  The enemy squadrons were now beginning to move into position to attack Khopesh and Unforgiving.  The Task Force pulled away as shots from the enemy frigates peppered them.  

“All fighters recovered sir, we’ve got everyone from Obedience aboard.  Even if it’s tight fit,” the wing commander informed Tiaan.  

The task force made a quick jump away to light speed, with Tiaan wishing he had been able to just get one more bombing run in to destroy that MC80.  However, he knew he had done his job holding the enemy fleet there.

Epilogue
The Imperial defense of Corfai had been a brilliant success, in which Admiral Motti was widely praised.  Tiaan’s own efforts at Selonia to aid it had elicited some faint praise, which had allowed the Moff to get Obedience into the shipyards right away and get it back to full strength ahead of schedule.  It had also allowed him to make a chance to recruit a fighter ace, one who was both adept at dogfighting and at strategic bombing runs.   “Ah, Tan Stele, it's good of you to join me.  We have some things to discuss prior to our next mission together” Tiaan said as the pilot walked into his office, and the doors shut behind him.